DocsGetting started
Add an export menu
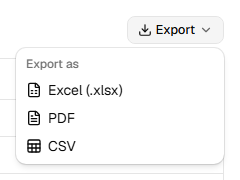
Pass the table you already render to ExportMenu. It works with the object useReactTable (v8) or useTable (v9) returns.
import { ExportMenu } from "@/components/export-menu"

const table = useTable({ features, columns, data })

<ExportMenu table={table} fileName="orders" pdfTitle="Orders" />
The menu offers Excel, PDF and CSV. Each file holds what the user is looking at: the visible columns in their order, every row that passes the current filter (on every page, not just the one on screen), in the current sort, with groups in place.
Props#
| Prop | What it does |
|---|---|
table |
A TanStack table, or pivot.table from a pivot. |
fileName |
File name without the extension. Default export. |
pdfTitle |
Title printed at the top of the PDF. |
formats |
Which items to show, e.g. ["xlsx", "csv"]. Default all three. |
rowStyle |
Style whole rows, e.g. pivotRowStyle for pivots. |
allowSelectedOnly |
Show "Selected rows only". Default: when rows are selected. |
onError |
Called if an export fails. Default console.error. |
label |
Button text. Default Export. |
The menu is plain source in your project. Change the icons, the labels or the button variant there.
Live example and sourceRun this in the browser and read the code behind it.Open →
Was this page helpful?
Thanks. To tell us more, write to info@jqwidgets.com.